Developing the idea in 2D
Who's done what before?
As I said Before, I-m interested in the machines that make paradigm, therefore, I'm focusing on the construction of a machine that will additively laminate wood strips as a final project.
I have done some research, and I feel that there is still a lot to cover with this project, but so far I've learned that Laminated Object Manufacturing is kind of being revived. A company that did it folded in 2019, only to be bought and relaunched as a lamination of paper company.
Another team from USC is looking at using the process with 6-axis robotics.
The process, as described here, is to have a couple of rollers that feed thin material on layers onto a bed, then glue it with rollers, and cut it to form, lowering the whole assembly and then repeating. Each layer is added to the workpiece, eventually getting a part. The process looks like this:
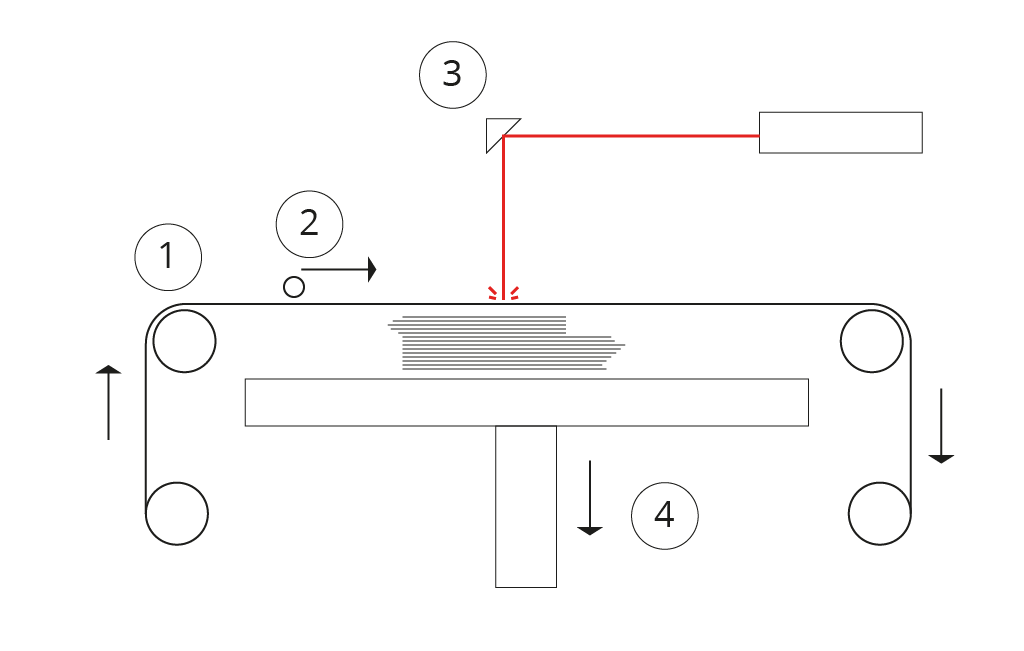
Material is fed onto the work area (1) by rollers. Then a roller glues the membrane on the top side (2). A laser cuts the material according to part geometry (3). The work area is lowered so the process can begin again (4) adding more contours until the part is done.
What does it do?
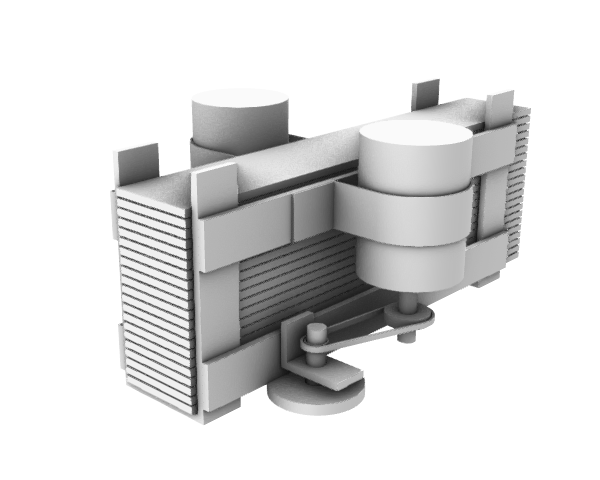
So, the basic idea is to have this same kind of process, with some minor tweaks. First, the idea is to first test this as a robotic arm effector, which would mean that the whole thing has to be performed by one single machine. Further development led me to realize that we can have the whole assembly "upside down" in order to So that there's nothing below the work piece, and the whole assembly going up instead of the table going down as the as the "Z" control.It would look something like this:
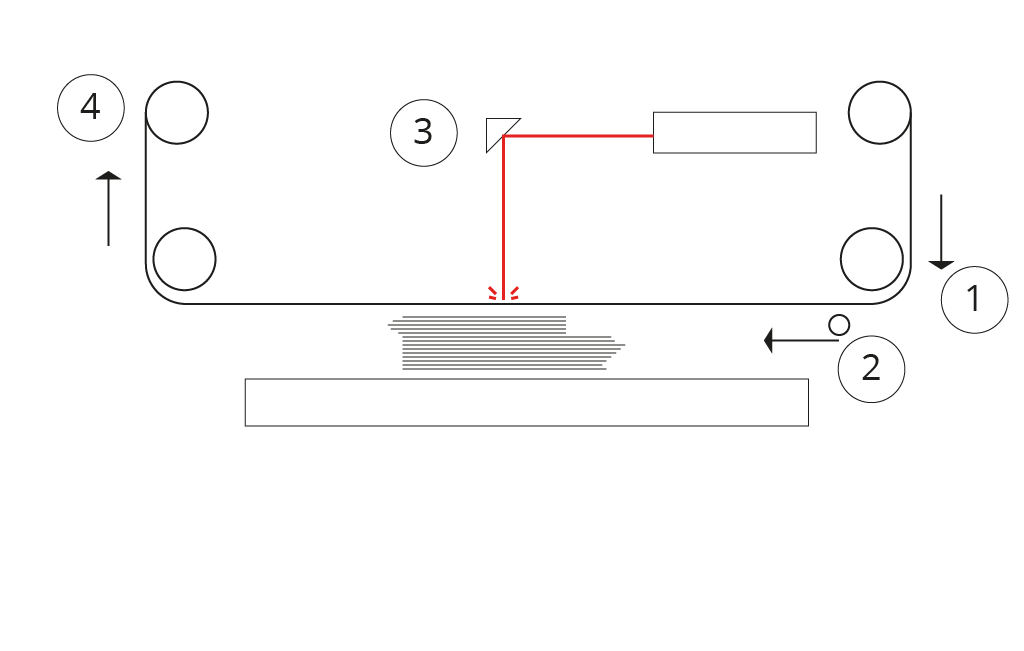
At (4) is where instead of having a table go "down", we woud have the whole laminating machine go "up". This would allow for the piece to remain stationary, and we could then move the whole thing, removing the size constraint.
As shown on week 1 the assembly would do something very similar, but the material would be thicker, wooden slats or crown moulding. I'm thinking 1/4" by 1".

Taking into account the principle of turning the thing upside down, the challenge is to have he whole thing without anything below, so as to be able to place the slat pieces incrementally. Like this:
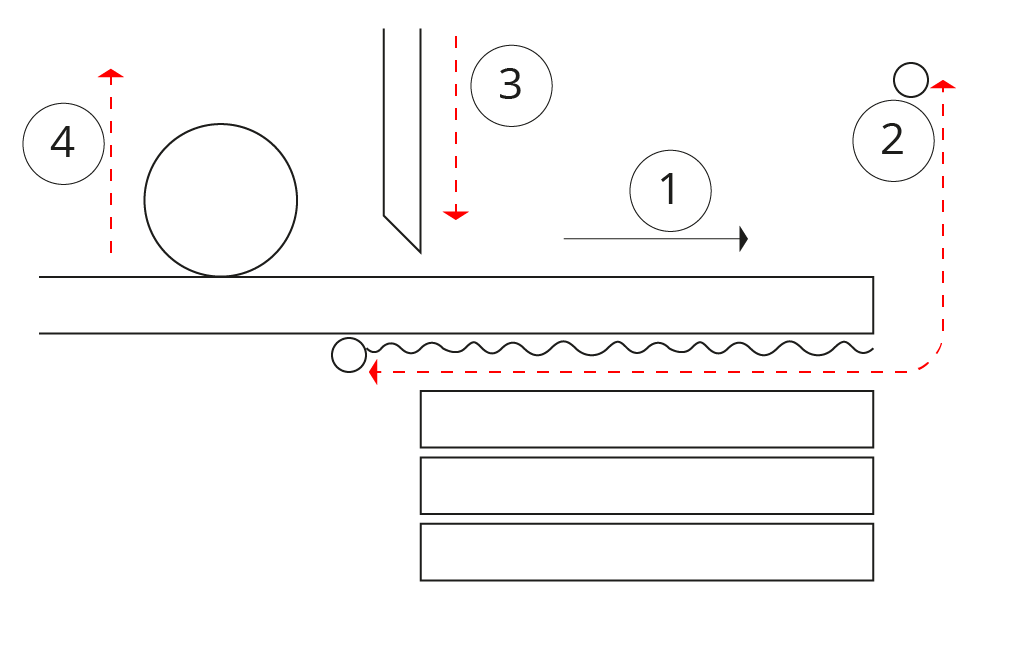
The machine has to feed the wooden slat (1) make the roller glue the underside of the slat (2). Place and cut the slat (3). Move upwards and start the process again (4).
What parts or systems will be made?
In conclusion, there are 3 or 4 assemblies or thing the machine needs to get additive manufacturing of wooden slats.
- Feed Assembly: The parts that make the wooden slat go forward into position. We can have G-code to control a stepper motor that does this.
- Glue Assembly: The roller that dispenses glue to the underside of the slat. This is a somewhat complex mechanism, as it'll have to be a servo that does a specific rotation and some gears or mechanisms that transform the motion into an "L" shape that takes the roller out of the way for placing the slat.
- Cutting Assembly:The machine that cuts the slat to size. We can have a pneumatic actuator, or some sort of jigsaw hacked into position. Circular saws would be very bulky.
- Elevator or placing Assembly:(optional)This assembly would be in charge of placing the slat piece onto the work piece if I can't figure out how to make the feed assembly to have necessary clearance underneath. It could be a solenoidal gripper effector that lowers the piece and perhaps have a nailing gun or some other fastening device.
All of these diagrams were made in Adobe Illustrator. I looked at inkscape, but I've been using illustrator for years and I'm pretty good at it. These were made in very little time using only simple shapes and paths. The only advanced functionality was Effects>>>Stylize>>>round corners for getting the rounded paths of the sheet rolls. Arrows is a built in function of the path tool, and move, align and distribute are age-old features of vector graphics programs. I also made this video in photoshop: